Showing posts with label Bars I Brownies. Show all posts

Monday, July 10, 2017

~ Resipi Red Velvet Cheese Brownies...

Sheery Dream Cakes | 9:27 AM | 2 Comments so far

Assalamualaikum dan Salam Sejahtera...

Sebut sahaja Red Velvet Cake atau Kek Baldu Merah, pasti akan terbayangkan keenakan kek yang digandingkan bersama cream cheese frosting tu kan. Kek ini sedap juga digandingkan bersama butterceam atau frosting kegemaran masing-masing. Hari ini bukan resipi kek yang hendak dikongsikan, tetapi resipi brownies ya. 

Red Velvet Cheese Brownies ni sudah banyak kali Diana buat. Cuma, belum pernah lagi Diana kongsikannya di sini. Pada bulan ni sahaja sudah 2 kali Diana buat brownies ni. Yang terbaru pada sabtu lepas, 14 Syawal. 

Resipi milik Akak Shiela, Spices Journey ini sememangnya sedap. Menurut akak Shiela, adalah lebih baik jika kita membuat tepung kek tu sendiri. Ini kerana kandungan tepung jagung di dalam tepung kek itu yang akan membuatkan brownies ni lebih sedap. Diana pernah membuat brownies ni denagn menggunakan tepung kek yang sedia ada di pasaran dan juga yang kita buat sendiri. Hasilnya memang ternyata brownies yang menggunakan tepung kek buatan sendiri lebih sedap. Itu di tekak Diana lah ya. Lain orang lain pula citarasanya ya tak?

Experiment bersama bahan berlainan membuat brownies ni tidak berhenti di situ sahaja. Diana pernah juga buat brownies ni tanpa bubuh cuka dan soda seperti yang akak Azlita Masam Manis terangkan di SINI. Memang texture dan rasanya berbeza sedikit. Tetapi keenakan brownies ni tetap sama. Jadi seperti kata akak Azlita, ianya terpulanglah kepada citarasa masing-masing ya.

Baiklah, jom kita semak resipinya pula. Terima kasih buat akak Shiela kerana sudi berkongsi resipi yang sedap ni dan terima kasih juga buat semua yang pernah mengetengahkan resipi ni. Izinkan Diana kongsikannya di sini pula ya.

:: Resipi Oleh ~ Akak Shiela @ Spices Journey  ( TQ )


RED VELVET CHEESE BROWNIES

Bahan-Bahan Brownies
  • 250 gm high grade butter
  • 1/2 cawan minyak jagung
  • 2 sudu besar serbuk koko
  • 200 ml natural yogurt
  • 1 1/4 cawan gula kastor
  • 2 biji telur gred A
  • 2 cawan tepung kek
  • 1 sudu teh esen vanilla
  • 1 sudu teh soda bikarbonate
  • 1 sudu teh cuka atau jus lemon
  • 1 sudu teh pewarna merah

** NOTE : 
Tepung kek BUKAN tepung naik sendiri / self raising flour ya. Jangan silap, nanti texturenya akan berbeza. Sebaiknya kita buat sendiri tepung kek tersebut : 
  • Bagi sukatan 1 cawan, masukkan 2 sudu besar tepung jagung dan penuhkan selebihnya dengan tepung gandum. Ayak sebelum digunakan.
Kandungan tepung jagung dalam kek yang membuat rasanya lebih sedap selain menggunakan bahan yang berkualiti untuk mendapatkan kek yang betul-betul sedap.


Cara-Cara
  1. Sediakan loyang 4 segi bersaiz 9 x 9 inc atau 10 x 10 inc, alas dengan kertas minyak dan ketepikan.
  2. Panaskan oven pada suhu 175°C.
  3. Cairkan mentega dan minyak jagung dengan kaedah double boiler hingga larut, kemudian sejukkan sebentar.
  4. Ayak tepung kek bersama serbuk koko, ketepikan.
  5. Yogurt dicampurkan pewarna merah, kacau sebati dan ketepikan.
  6. Dalam mixer, pukul telur dan gula hingga sebati.
  7. Kemudian masukkan minyak jagung dan butter yang telah dicairkan dan gaul sebati.
  8. Masukkan yogurt yang telah dicampur pewarna merah dan pukul sebentar hingga mesra.
  9. Selepas itu, masukkan campuran tepung dan koko sedikit demi sedikit sambil diadun hingga rata.
  10. Tuangkan esen vanilla dan gaul rata.
  11. Asingkan 2 atau 3 sudu besar adunan ini untuk dibuat corak di atas adunan cheese nanti.
  12. Akhir sekali campurkan soda dan cuka atau jus lemon di dalam bekas kecil. Kacau dan tuang cepat-cepat ke dalam adunan. Gaul rata dengan pantas.
  13. Tuangkan adunan ke dalam loyang dan bakar pada suhu 175°C selama 40-50 minit  atau sehingga brownies masak bergantung pada kapasiti oven masing-masing.
  14. Sementara menunggu brownies kita masak, kita sediakan lapisan cheese pula.


Bahan-Bahan Lapisan Cheese ( Diana buat 2 kali adunan di bawah )
  • 350 gm cream cheese
  • 1 cawan gula icing
  • 1 biji telur gred A
  • 1 sudu besar jus lemon atau lemon paste


Cara-Cara
  1. Putarkan cream cheese hingga berkrim.
  2. Masukkan gula icing dan pukul sebati
  3. Kemudian masukkan telur dan pukul lagi hingga sebati.
  4. Masukkan jus lemon dan putar lagi.
  5. Tuangkan di atas brownies yang telah masak tadi dan ratakan ( tak perlu sejukkan brownies terlebih dahulu ).
  6. Isikan adunan brownies yang diasingkan tadi ke dalam piping beg dan kemudian lorekkan mengikut kreativiti masing-masing.
  7. Masukkan semula dalam oven dan bakar selama 30 minit atau hingga masak. 
  8. Bila dah masak sejukkan hingga betul-betul sejuk barulah di potong dan di hidangkan.

** Diana kurangkan suhunya kepada 150°C dan setelah ianya masak, Diana biarkan ianya di dalam oven tanpa kuasa selama 10 minit. Kemudian keluarkan brownies dan sejukkan.


::  Ini brownies yang dibubuh soda dan cuka dan menggunakan 2 loyang 8x3 inc  ::


BACA SELANJUTNYA / READ MORE >>>

Thursday, September 4, 2014

~ Red Velvet Tiramisu Brownies Recipe...

Sheery Dream Cakes | 8:40 PM | 5 Comments so far
Assalamualaikum dan Salam Sejahtera.... 

Untuk makluman semua pengunjung SBK... Mulai hari ini SBK akan dikenali sebagai Melley Mey's Kitchen ya... Namun Sky Blue's Kitchen atau Melley mey's Kitchen pun sama juga.. Masih lagi dimiliki oleh empunya blog yang sama.. 

Baiklah... Tidak mahu membebel panjang di entri ini.. Apa kata kita terus cerita tentang resipi kali ini...

Red Velvet Tiramisu Brownies... Ermmm... Memang pertama kali Diana mencuba gabungan  rasa brownie dan tiramisu... Jika suka makan tiramisu dan red velvet... Memang sesuai lah ya sebab ianya  2 in 1 gitu... Boleh rasa keduanya sekaligus... Cuma.. Kali ini Diana terlupa pula ayakkan serbuk koko di atasnya tu... Huhuuu... Tak apalah kan.. Lain kali boleh cuba lagi... ;) Jom semak resipinya pula..


:: Resipi Oleh ~ Yummy Addiction  ( TQ )

RED VELVET TIRAMISU BROWNIES  


Ingredients

For the red velvet brownies
  • 1 cup ( 125 g ) all-purpose flour
  • ½ teaspoon baking powder
  • ⅓ teaspoon salt
  • 2 large eggs, at room temperature
  • ½ cup ( 113 g ) unsalted butter
  • 2 oz. dark chocolate
  • ¾ cup ( 170 g ) granulated sugar
  • 1½ teaspoon vanilla extract
  • 2 tablespoons unsweetened cocoa powder
  • 1 tablespoon red food coloring ( or as needed )
  • 1 teaspoon apple cider vinegar

For the tiramisu
  • 4 egg yolks
  • ⅓ cup ( 67 g ) sugar
  • ⅓ teaspoon vanilla extract
  • 1 cup ( 225 g ) mascarpone cheese, at room temperature
  • ½ cup ( 125 ml ) heavy whipping cream
  • ½ cup cold-brewed coffee
  • 3 oz. ( 85 g ) soft ladyfingers
  • cocoa powder, for topping
  • chocolate shaves, for topping ( optional )


Instructions
  1. Red velvet brownies: Preheat oven to 350 degrees. Line an 8-inch square baking pan with parchment paper, and lightly spray with nonstick spray. Set aside.
  2. In a small bowl, combine flour, baking powder and salt. Set aside. In another small bowl, beat eggs until foamy. Set aside. Melt the butter and chocolate in a large microwave safe bowl in 30 second increments until melted. Stir in the sugar, vanilla, cocoa powder. Carefully whisk in the food coloring (to desired color) until combined. Sir in the vinegar. Slowly stir in the eggs, then fold in the flour mixture until it is all combined. Do not overmix. Pour batter into prepared pan and spread evenly. Bake for about 30-35 minutes, or until a toothpick inserted in the middle comes out clean. Place on wire rack to cool completely.
  3. Prepare a strong espresso coffee.
  4. Tiramisu: Place the egg yolks and sugar in the heatproof bowl, and whisk together until they become pale yellow. Set a heatproof bowl on top of a saucepan of simmering water, making sure the water doesn't touch the bottom of the bowl. Cook on low, stirring and whisking constantly, until the mixture thickens and forms a ribbon trail on the surface when the whisk is lifted (for about 5-7 minutes). Remove from the heat and let cool slightly. Whisk in vanilla. Beat in the mascarpone until smooth. In a separate bowl, beat the whipping cream until soft peaks form. Gently fold into the cheese mixture.
  5. To assemble the tiramisu browniesPour a quarter of the tiramisu mixture over the brownies and spread evenly over the top. Arrange the ladyfingers on top of the tiramisu mixture. Using a pastry brush, brush tops of ladyfingers with coffee until they are saturated. Pour remaining tiramisu mixture on top and spread evenly with a spatula. Sprinkle with cocoa powder and grated chocolate. Cover with plastic wrap and refrigerate at least 1 hour. Cut into bars and enjoy!

Notes
Store in refrigerator.


BACA SELANJUTNYA / READ MORE >>>

Wednesday, February 6, 2013

~ Brownie & Plum Trifles...

Sheery Dream Cakes | 4:11 PM | 9 Comments so far

Assalamualaikum dan Salam Sayang semua... 

Hari ini Diana nak kongsikan Brownie & Plum Trifles... Pada mulanya Diana tiada niat pun hendak ambil gambarnya.. Tapi di dalam tak sihat pagi tadi.. Ambil jugalah gambarnya main-main.. Hehehe.. Ermmm... Ambil gambar ini awal pagi lagi.. Masa yang memang belum lagi masa yang sesuai untuk mengambil gambar makanan... Cahaya yang terlalu terang pagi tadi tapi hentam juga ambil gambar.. Hahaa... Props untuk ambil gambar segala pun tidak dapat diambil sebab dapur tengah diubah suai sekarang ( lupa keluarkan dulu .. huhuuu ) Tu yang malas hendak ambil gambar buat masa ini.. Pakai apa yang ada sahaja lah nampaknya.. Tapi tidak apalah kan.. Diana kongsikannya jugalah di sini ya.. 

Resipinya pun main campak-campak sahaja.. :D.. Diana buat pun sebab hendak habiskan brownies tu... Jom tengok resipinya.. Atau lebih tepat kita sebut ianya sebagai idea untuk pencuci mulut kan.. ;). Ya lah dah resipi campak-campak gitu.. Jadi hanya untuk memberi idea sahajalah kan lebih tepat... Hihii...


:: Olahan Oleh ~ Sky Blue's Kitchen

BROWNIE & PLUM TRIFLES  

Bahan-Bahan
  • Sedikit Caramello brownies _ resipi rujuk di bawah ( The Baked Brownie )
  • Salted caramel secukupnya _ resipi rujuk di bawah
  • Fresh cream / Non-Dairy whipping cream _ dipukul hingga kental
  • Hirisan buah plum
  • Kacang pistachio _ ditumbuk

Cara-Cara
  1. Potong brownies kepada ketulan kecil dan ketepikan.
  2. Sediakan bekas yang sesuai dan masukkan sedikit fresh cream di dalamnya.
  3. Kemudian masukkan brownies dan tuangkan salted caramel di atasnya.
  4. Ulang langkah no. 2 dan 3. Buat sehingga bekas yang digunakan penuh. Taburkan dengan kacang pistachio tumbuk di atasnya.
  5. Sedia untuk dihidang.


THE BAKED BROWNIE  

:: Sumber ~ Brown Eyed Baker ( TQ )
:: Dulu Diana guna resipi ini untuk Ferrero Rocher Brownies 

INGREDIENTS

  • 1 1/4 cups all-purpose flour
  • 1 teaspoon salt
  • 2 tablespoons dark unsweetened cocoa powder
  • 11 ounces dark chocolate, coarsely chopped 
  • 1 cup ( 8 ounces ) unsalted butter, cut into 1-inch pieces
  • 1 teaspoon instant espresso powder 
  • 1 1/2 cups granulated sugar 
  • 1/2 cup packed light brown sugar
  • 5 eggs, at room temperature
  • 2 teaspoons vanilla extract

Method

  1. Preheat the oven to 350 degrees F. Butter the sides and bottom of a 9 x 13-inch glass or light-colored baking pan. Line the pan with parchment paper.
  2. In a medium bowl, whisk the flour, salt, and cocoa powder together.
  3. Put the chocolate, butter and instant espresso powder in a large bowl and set it over a saucepan of simmering water, stirring occasionally, until the chocolate and butter are completely melted and smooth. 
  4. Turn off the heat, but keep the bowl over the water and add the sugars. Whisk until completely combined, then remove the bowl from the pan. The mixture should be room temperature.
  5. Add 3 eggs to the chocolate mixture and whisk until combined. Add the remaining eggs and whisk until combined. 
  6. Add the vanilla and stir until combined. Do not overbeat the batter at this stage or your brownies will be cakey.
  7. Sprinkle the flour mixture over the chocolate mixture. Using a rubber spatula ( not a whisk ), fold the flour mixture into the chocolate until just a bit of the flour mixture is visible.
  8. Pour the batter into the prepared pan and smooth the top. Bake in the center of the oven for 30 minutes, rotating the pan halfway through the baking time, until a toothpick inserted into the center of the brownies comes out with a few moist crumbs sticking to it. 
  9. Let the brownies cool completely, then lift them out of the pan using the parchment paper. Cut into squares and serve.
  10. Store at room temperature in an airtight container or wrap with plastic wrap for up to 3 days.
( Recipe adapted from ~ Baked : New Frontiers in Baking 


SALTED CARAMEL  
:: Sumber dari ~  Manda @ Once Upon My Life  ( TQ )

INGREDIENTS

  • 1 cup sugar
  • 6 tablespoons salted butter cubed
  • 2/3 cup heavy cream, at room temperature _ Diana gantikannya dengan 1 tin kecil Nestle Cream ( Original ) 
Method
  1. Melt the sugar over medium high heat in a large pot. 
  2. Whisk the sugar as it melts and cook until it becomes a deep amber color. 
  3. Add the butter and stir it in until melted. 
  4. Pour in the heavy cream ( mixture will foam ) and whisk until you get a smooth sauce. You may have some lumps but keep stirring until they have melted. 
  5. Remove from heat and let cool. {I f you still have some lumps in the caramel after it has cooled - strain it through a fine mesh strainer }.  
  6. Store, covered, in the fridge. 

::  Letakkan coklat Caramello di atasnya sebelum membakar  ::


BACA SELANJUTNYA / READ MORE >>>

Tuesday, November 13, 2012

~ Ferrero Rocher Brownies...

Sheery Dream Cakes | 7:46 AM | 11 Comments so far

Assalamualaikum dan Salam Sejahtera semua... 

Bersiaran di awal pagi kali ini SBK ingin berkongsikan 1 resipi brownies.. Semasa mencari resipi brownies.. Diana terjumpa dengan blog ini.. Brown Eyed Baker.. Terpikat kepada beberapa resipi brownies kat sana.. Teringin nak mencuba resipi Peanut Butter Brownies.. Tapi macam tak berapa nak rajin nak buat peanut butter topping / swirl tu.. Ermmm... Jadi buat mana yang senang sahaja lah kan.. Hehehee...


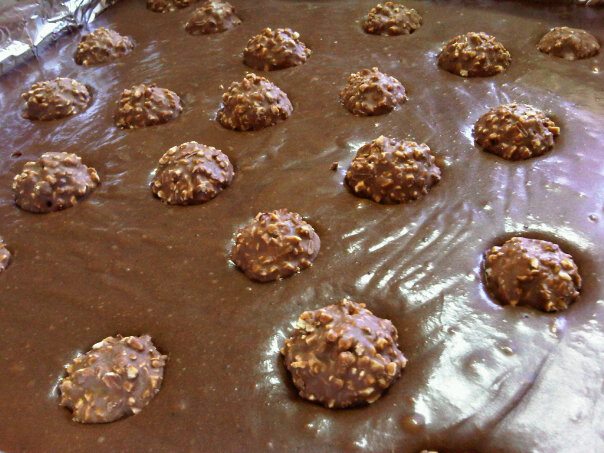
Akhirnya buat tanpa topping ( The Baked Brownie  ).. Tapi gantikan dengan Ferrero Rocher pula... Tu sahaja jalan yang paling mudah nak makan brownies.. Heehee :D.. Tak apalah.. Lain kali baru buat lagi yang lain.. :). Anak-anak Diana suka makan Ferrero Rocher Brownies ni.. Sedap di tekak kami sekeluarga.. Cuma sukatan gulanya Diana telah kurangkan mengikut citarasa keluarga Diana ya.. Kepada Brown Eyed Baker.. Izinkan Diana pula kongsikannya di sini pula ya.. Terima kasih.. Nak resipinya? Jom tengok resipinya pula...


:: Sumber ~ Brown Eyed Baker ( TQ )


THE BAKED BROWNIE / FERRERO ROCHER BROWNIES

INGREDIENTS


  • 1 1/4 cups all-purpose flour
  • 1 teaspoon salt
  • 2 tablespoons dark unsweetened cocoa powder
  • 11 ounces dark chocolate, coarsely chopped
  • 1 cup ( 8 ounces ) unsalted butter, cut into 1-inch pieces
  • 1 teaspoon instant espresso powder 
  • 1 1/2 cups granulated sugar _ ( Diana bubuh 1 cawan sahaja )
  • 1/2 cup packed light brown sugar
  • 5 eggs, at room temperature
  • 2 teaspoons vanilla extract

Method

  1. Preheat the oven to 350 degrees F. Butter the sides and bottom of a 9 x 13-inch glass or light-colored baking pan. Line the pan with parchment paper.
  2. In a medium bowl, whisk the flour, salt, and cocoa powder together.
  3. Put the chocolate, butter and instant espresso powder in a large bowl and set it over a saucepan of simmering water, stirring occasionally, until the chocolate and butter are completely melted and smooth. 
  4. Turn off the heat, but keep the bowl over the water and add the sugars. Whisk until completely combined, then remove the bowl from the pan. The mixture should be room temperature.
  5. Add 3 eggs to the chocolate mixture and whisk until combined. Add the remaining eggs and whisk until combined. 
  6. Add the vanilla and stir until combined. Do not overbeat the batter at this stage or your brownies will be cakey.
  7. Sprinkle the flour mixture over the chocolate mixture. Using a rubber spatula ( not a whisk ), fold the flour mixture into the chocolate until just a bit of the flour mixture is visible.
  8. Pour the batter into the prepared pan and smooth the top. Bake in the center of the oven for 30 minutes, rotating the pan halfway through the baking time, until a toothpick inserted into the center of the brownies comes out with a few moist crumbs sticking to it. 
  9. Let the brownies cool completely, then lift them out of the pan using the parchment paper. Cut into squares and serve.
  10. Store at room temperature in an airtight container or wrap with plastic wrap for up to 3 days.

( Recipe adapted from ~ Baked : New Frontiers in Baking )


::  Sebelum membakar susun beberapa Ferrero Rocher di atasnya  ::


BACA SELANJUTNYA / READ MORE >>>

Thursday, May 31, 2012

~ Chocolate Covered Brownie Ice Cream Sandwiches Recipe...

Sheery Dream Cakes | 6:59 PM | 10 Comments so far

Assalamualaikum dan Salam Sayang kepada semua pengunjung SBK.. 

Sekarang ni cuaca kat Labuan agak panas.. Tapi sebelah petang cuaca bertukar mendung.. Namun masih terasa bahangnya.. Kat tempat anda macam mana pula? Walau apa pun keadaan cuaca kat tempat masing-masing..Diana berharap moga semuanya di dalam keadaan sihat sejahtera...  

Cuaca sekarang yang tak menentu.. Kekadang tu cuaca terlalu panas.. Bahang dapat dirasai walaupun hujan turun.. Jika dihidangkan ice cream di depan mata... Alangkah bahagianya kan .. . Ermmm... Diana sedang hidangkan ice cream ni... Nak tak? Heeeheeeheee... Siapa nak jemput join sekali eh.. :D.. Jangan malu-malu.. Buat macam rumah sendiri tau.. Layan diri ya.. Hiihiii.. 


Resipi ni Diana ambil dari blog Katie Goodman.. Hari tu masa Diana google resipi brownies.. Terjumpa la blog tu.. Kebetulan Irfan sedang memerhati juga tanpa Diana sedari.. Setelah beberapa hari selepas Diana tengok resipi ni.. Ada pula permintaan Irfan nak ice cream yang ada coklat.. Katanya hari tu mummy tengok tu.. Hahaaa... Dah kena daah... ^_^. Kebetulan pula Diana dah berjanji dengan abang dia nak buatkan Tiramisu hari tu.. Jadi sibuk la suasana kat dapur Diana hari tu.. ;). Buat Katie dan Jamie.. Izinkan Diana kongsikan resipi ni di sini pula ya.. Terima kasih.. 


:: Resipi Oleh ~ Jamie @ Sophistimom  ( TQ )
:: Sumber Dari ~ Katie @ GOODLIFE eats  ( TQ )

CHOCOLATE COVERED BROWNIE ICE CREAM SANDWICHES


Ingredients

For the Brownies
  • 1 stick ( 8 tablespoons ) unsalted butter, at room temperature
  • 1 cup granulated sugar
  • 2 tablespoons cocoa, plus more for pan
  • 2 eggs
  • 1 teaspoon pure vanilla extract
  • 3/4 cup flour
  • Pinch of kosher salt

For the Ice Cream Sandwiches
  • 1 quart vanilla ice cream, slightly softened
  • 2 pounds chocolate chips
  • 1 teaspoon oil


Directions
  1. Preheat the oven to 350 degrees. Butter a quarter sheet pan ( a small jelly roll pan ), or a 13 x 9 inch pan. Place a sheet of parchment paper in the bottom, spread with butter, and dust with cocoa powder. Set aside.
  2. In the bowl of an electric mixer fitted with the paddle attachment, cream together butter, sugar, and 2 tablespoons of cocoa powder. When the mixture is creamy, and all lumps are gone, add in eggs, one at a time, incorporating well after each addition. Add in vanilla.
  3. With the mixer on low, add in flour and salt. Mix until just combined. 
  4. Spread into prepared pan and bake until shiny on the top, 10 - 15 minutes. 
  5. Remove from oven, and allow to cool completely.
  6. Remove brownie from the pan, and cut in half. 
  7. Spread ice cream on one half, and top with the other half. 
  8. Freeze for 2 - 4 hours, until firm.
  9. Cut the large ice cream sandwich into smaller sandwiches. Insert wooden popsicle sticks, and freeze for another hour.
  10. Melt the chocolate chips with the oil in the microwave in 30 second intervals, until chocolate is smooth. 
  11. Dip each ice cream sandwich in the chocolate, and let set on a sheet of parchment paper. 
  12. Wrap in parchment paper and freeze until ready to serve.


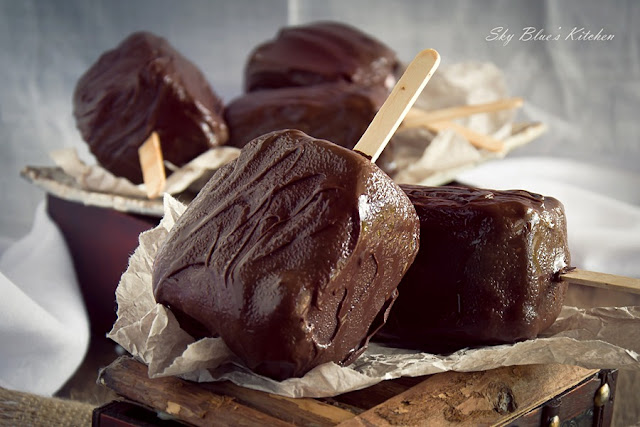
Semasa cuaca panas kat Malaysia ni.. Memang agak sukar nak ambil gambar Chocolate Covered Brownie Ice Cream Sandwiches ni... Ianya mudah cair walaupun sedang duduk di dalam bilik yang airconnya sedang dipasangkan.. Ini sahaja la hasil gambar yang dapat diambil.. Kalau nak tengok versi cantik tu.. boleh tengok kat  SINI ya.. Selamat mencuba... :)


BACA SELANJUTNYA / READ MORE >>>

Saturday, March 3, 2012

~ Lower Fat Fudge Brownies / Yogurt Brownies Recipe...

Sheery Dream Cakes | 6:41 PM | 11 Comments so far

Assalamualaikum dan Salam Sejahtera semua... 

Petang ni Diana nak kongsikan resipi brownies yang sangat mudah untuk membuatnya.. Rasanya pun ok... Irfan memang suka makan brownies ni.. Nie hasil Irfan tergoda kat dapur Izah ler ni yer... :) Semalam semasa singgah kat dapur Izah.. Irfan pun tengok sama.. Diana komen kat sana.. Irfan pula minta mummy dia ni buatkan... Tapi tadi baru dapat penuhi permintaan dia.. 


Cuma Diana hias brownies ni dengan coklat perisa strawberry.. Tu yang Irfan bertambah suka makan tu... Ermmm... Ni dah bubuh coklat ni bertambah ler naik berat badan berkilo² eh.. :D.. Tak tau macam mana ler nak diet ni kan... Dah buat low fat brownies tapi bubuh juga coklat... Hehehehe... Layaan... ^_^.. Terima kasih buat Izah kerana mengetengahkan resipi brownies ni.. Terima kasih juga kepada Emily Brooks di atas resipi ni.. Izinkan Diana pula kongsikannya kat sini... Terima kasih... 


::  Mulanya tu bubuh sikit jer coklat tu.. tapi Irfan nak mummy dia nie lapis lagi dan lagi.. :D  ::

:: Resipi Oleh ~ Emily Brooks @ allrecipes  ( TQ )
:: Sumber Dari ~ Izah @ Izah Muffin Lover  ( TQ )


CONGO BARS

Ingredients
  • 1 cup white sugar
  • 6 tablespoons unsweetened cocoa powder
  • 10 tablespoons plain yogurt
  • 2 eggs
  • 1/8 teaspoon salt
  • 1 teaspoon vanilla extract
  • 1/2 cup all-purpose flour
  • 1 tablespoon all-purpose flour

Directions
  1. Preheat the oven to 325 degrees F (165 degrees C ). Grease an 8 x 8 inch baking dish. ( Diana guna loyang bersaiz 8 x 6" ).
  2. In a medium bowl, stir together the sugar, cocoa powder and yogurt. 
  3. Stir in the eggs one at a time until well blended, then add vanilla and salt. 
  4. Stir in the flour until just absorbed. Spread evenly into the prepared pan.
  5. Bake for 28 to 32 minutes in the preheated oven, until the brownies begin to pull away from the sides of the pan, and a toothpick inserted comes out fairly clean ( sticky crumbs are okay ). 
  6. Cool brownies in the pan over a wire rack before cutting into squares. 
  7. Cover tightly with plastic wrap to store.


BACA SELANJUTNYA / READ MORE >>>